 on the tool, the related item on this page will be shown.
 Start dialog
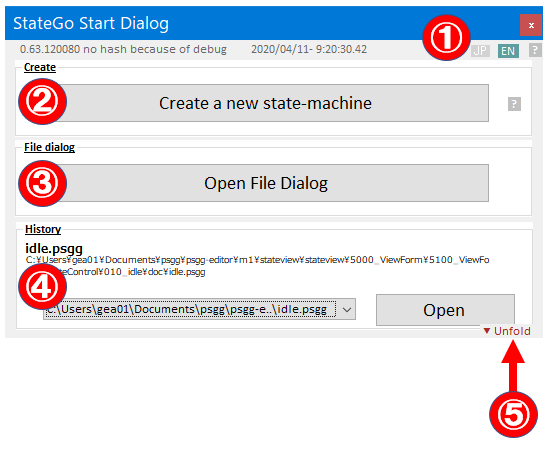
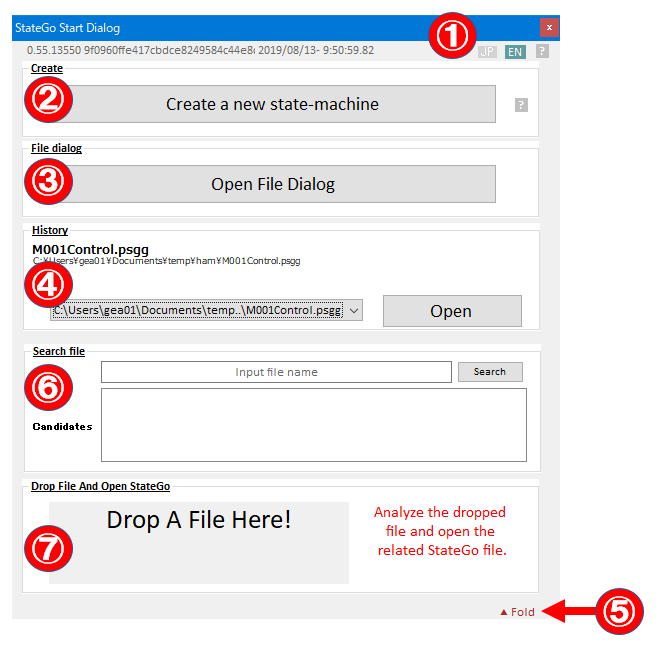
When "StateGo.exe" executes then its start dialog will be displayed.
① Change language between Japanese and English.
② Create new statemachine.
③ Open an existance file using File Open Dialog.
④ Open an file from history list.
⑤ Expand the window. You can use both ⑥ and ⑦ features.
⑥ Search StateGo file using text. You can open a StateGo file on the result list by double-clicking.
⑦ Open StateGo File by analyzing a dropping file.
Create New Statemachine
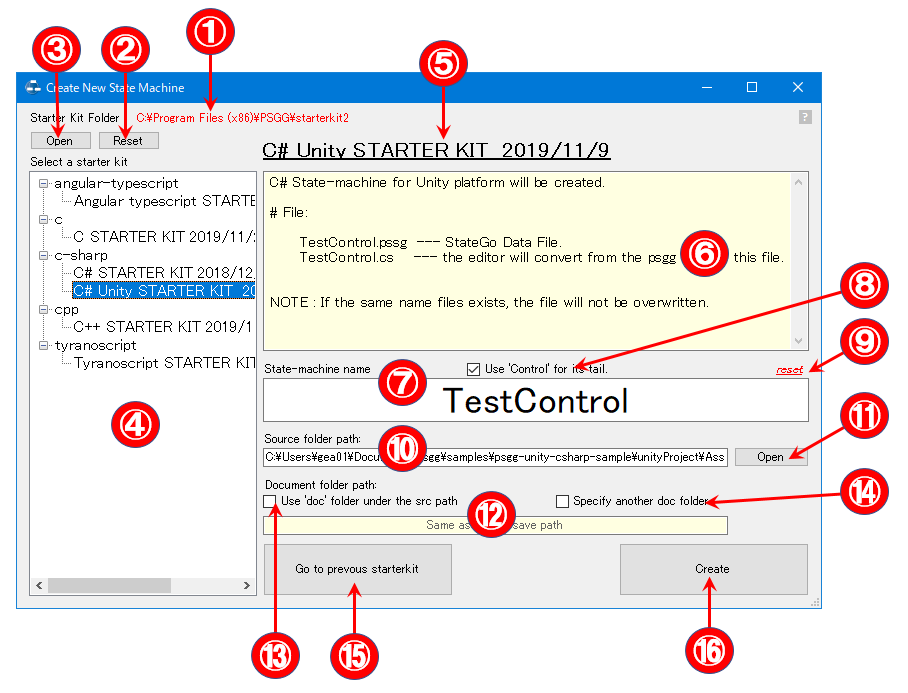
# Create a new state machine.
StateGo's state machine basically consists of two files.
- StateGo data file with extension .psgg
Stores the data composing the StateGo state machine in text format
- Output source
This is an output source, and the extension varies depending on the programming language.
The above files are managed with the same file name.
For example, if the file name is HogeControl and the programming language is C #
HogeControl.psgg
HogeControl.cs
Note 1) Files other than the above may be generated by the start kit.
i.e.
helpweb.html
Macro file
Management file
Note 2) The Excel file has been changed to use the Edit option.
# The procedure and contents of each item are as follows
1. Select start kit
① Start kit route path display
② Reset start kit root path (to default)
③ Change the start kit route path
④ Start kit list
⑤ Start kit name being selected
⑥ Details of the selected start kit
2. Determination of state machine name
⑦ State machine name input area
⑧ Check box for forcing the state machine name to end with “Control”
⑨ Reset state machine name (to default)
3. Determine the source folder
⑩ Input area for storage folder of generated source
⑪ Open the folder specification dialog
4. Determination of document storage folder
⑫ Document storage folder input area (if necessary)
⑬ Check box for forcing doc folder directly under source storage folder
⑭ Check box for individually specifying the document storage folder
* If ⑬ and ⑭ is not specified, it will be the same as the source folder.
5. Generation
⑯ Button for generating a state-machine.
Note: The old start kit can be used with the ⑮ button.
Main Window
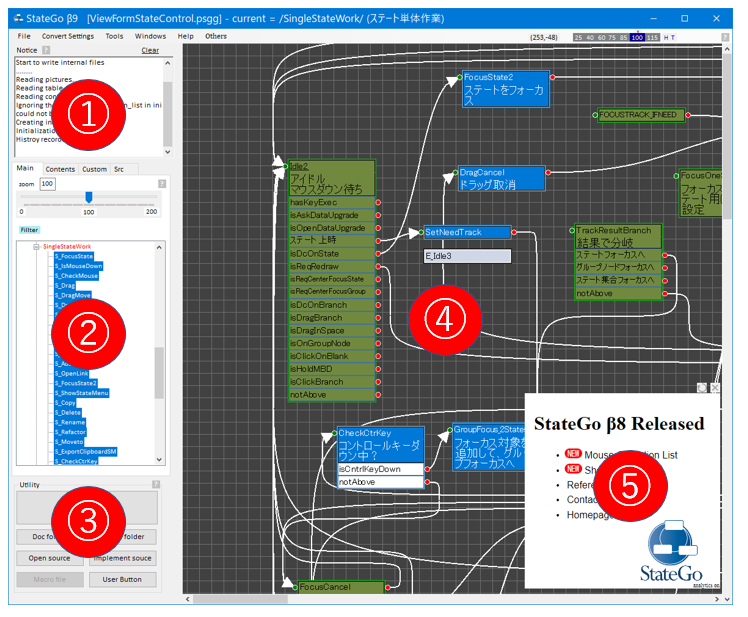
① Notice panel
It notifies the process status.
It displays important issue with red color.
② Multi panel
Main Panel・Contents Panel・Custom Panel・Help Panel・Source Panel
③ Utility panel
Convert button, open file button, etc.
④ State Edit panel
Edit states by GUI.
Basic Operation
⑤ Advertisement panel
Main Window Top
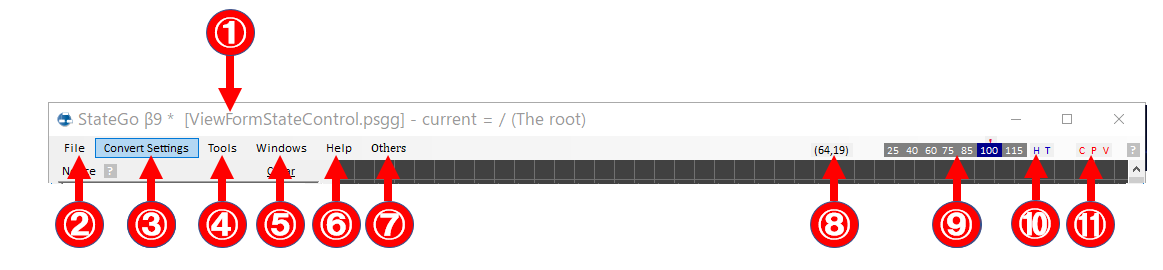
① It shows the working file name and current group path.
The group root is "/"
② It shows File Menu.
③ It shows Convert setting Menu.
④ It shows Tools Menu.
⑤ It shows Window Selection Menu.
It shows list of StateGo windows.
⑥ It shows Help Menu.
⑦ It shows Other Menu.
⑧ It shows the pointer position.
You may use it for searching state position.
⑨ Enlarge and Shrink buttons.
⑩ [Go to Head] and [Go to Tail] buttons.
⑪ Notice what to change.
C : Some Item values are changed.
P : Some positions are changed.
V : Viewing groug is changed.
Main Window・File Menu
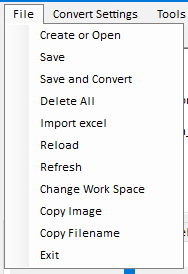
Create or Open
Open Start DialogSave
Save all information.Save and Convert
Save all information, then convert to the source code.This is as same as "Save and Convert" button on Utility Panel.
Import excel
[Compatibility of previous versions]Import StateGo Excel file.
Reload
Reload all information from file.※ The information that is being edited will be lost.
Refresh
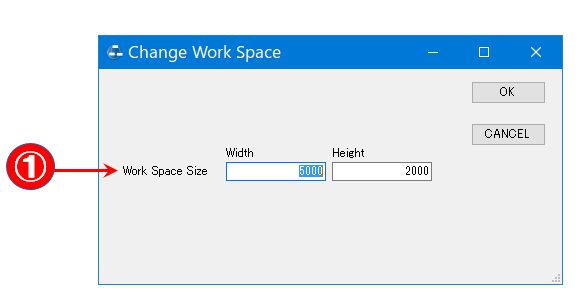
Refresh Edit State Panel.Change Work Space
Open "Change Work Space" dialog.Copy Image
Copy Edit State Panel to clipboard.※The image may be used for printout and etc.
Copy Filename
Copy this work file name to the clipboard.Exit
Exit StateGo.Main Window・Convert Menu
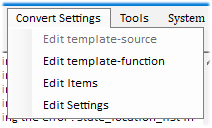
Edit template-source
This is for old StateGo release.It has not been used since beta release.
Edit template-function
Open the specified editor to edit Template-function.Edit Items
Open Edit Item Dialog.Edit Settings
Open the specified editor to edit the settings.Main Window・Tool Menu
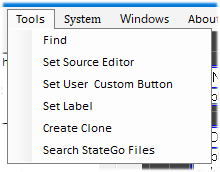
Find
Open Find Dialog.Set Source Editor
Open Set Source Editor Dialog.Set User Button
Open Set User Button Dialog.This dialog specifies User Custom Button on Utility Panel.
Set Label
Open Set Label Dialog.Create Clone
Open Create Clone Dialog.Search StateGo Files
Open Search StateGo Files Dialog.Main Window・Windows Menu
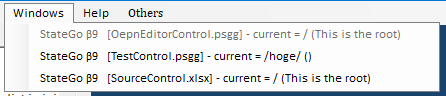
It shows all running StateGo as a list.
Selecting a StateGo on the list causes to switch the current StateGo to it.
Main Window・Help Menu
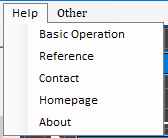
Basic Operation
Open Basic Operation Site.Reference
Open Referenc Site.Contact
Open Contact Site.Homepage
Open Homepage Site.About
Open About Dialog.Main Window・Other Menu
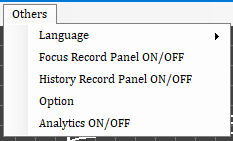
Language
Change language between English and Japanese.Focus Record Panel ON / OFF
Open or close Focus Record Panel.History Record Panel ON / OFF
Open or close History Record Panel.Option
Open Option dialog.Analytics ON / OFF
Open Analytics ON/OFF dialog.Main Window・Main Panel
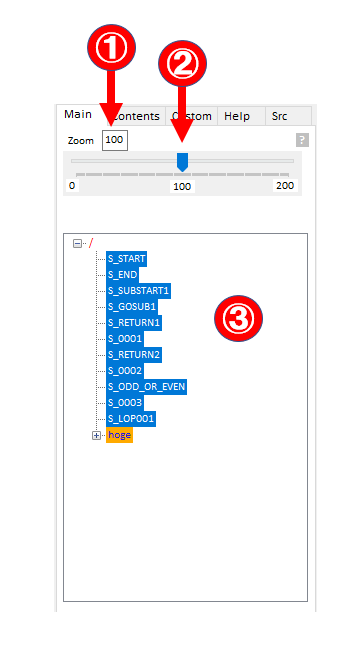
① Magnification rate
It is modifiable.
② Magnification gauge.
③ Node Tree
The state color is same as its drawing on State Edit panel.
When you move to a group, The tree will be refreshed to show correspondly.
Main Window・Contents Panel
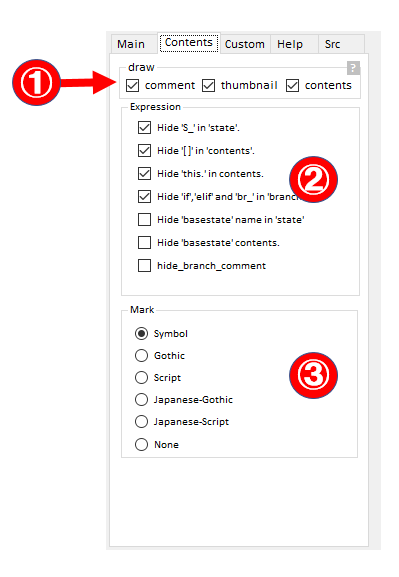
① There are State drawing options.
② There are Text options on state.
③ Threre are symbol mark options.
Main Window・Custom Panel
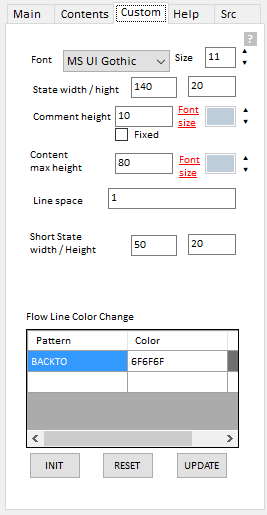
① There are font settings for states on State Edit Panel
② There are arrow settings.
Set arrow color with regular expression.
Main Window・Help Panel

It shows helpweb.html on Document Folder.
You may use it as note for creating state machine.
Main Window・Source Panel
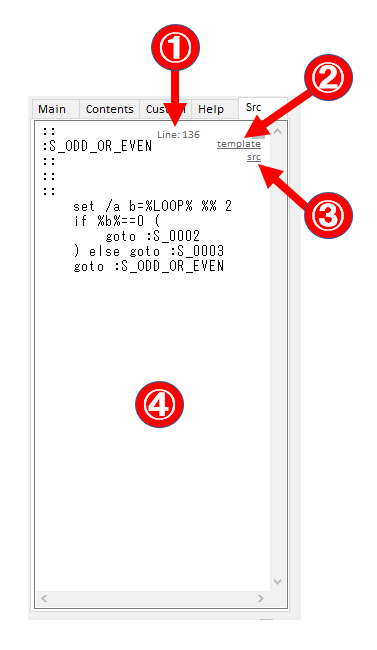
① The number indicates that the line number of the displaying content in the output source.
② Change to the template by clicking.
③ Change to the converted source by clicking.
④ Display the conveted source or the template.
The converted source of the focused state on State Edit Panel.
Main Window・Utility Panel
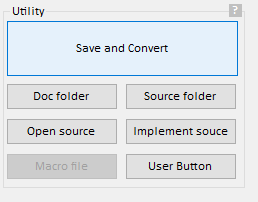
・【Save and Convert】button
It saves all data and converts from the state machine to the source.
・【Doc folder】button
It opens Document Folder.
・【Source folder】button
It opens Source Folder.
・【Converted source】button
It shows the converted source.
・【User button】
It executes the custom process.
The custom process is set by Windows Menu [tools]➡[Set User Button]
・【Macro file】button
It is valid when the starter-kit defines a macro file. Pushing causes opening the macro file.
・【Implement source】button
This button exists for compatible with older StateGo release.
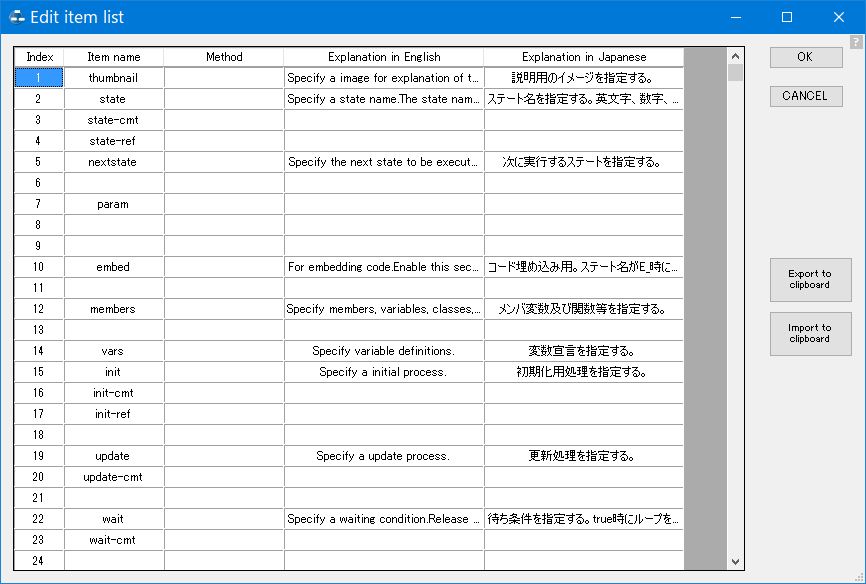
Edit Item Dialog
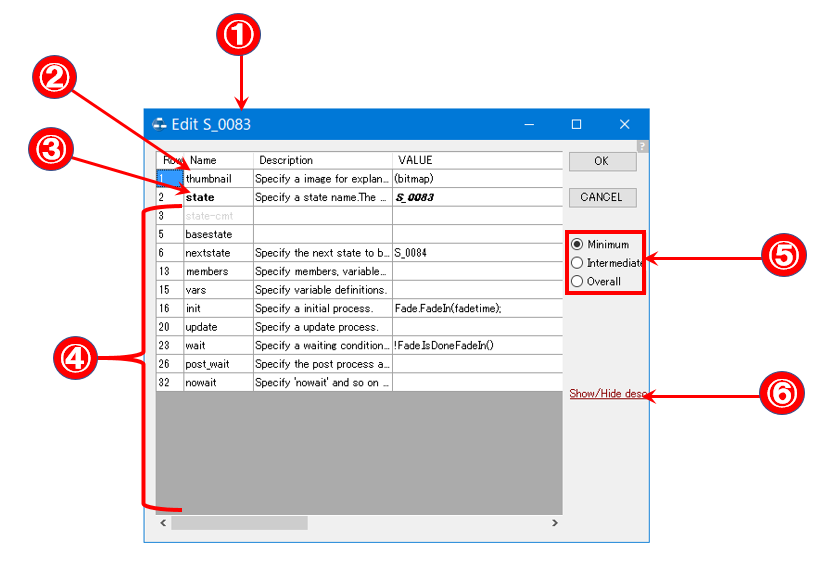
① The state name is displayed.
② Double-clicking "thumbnail" causes opening "Edit Thumbnail Dialog".
③ Double-clicking "state" causes opening "Edit State Dialog".
※ Light gray items are able to be ignored.
④ To edit these items double click.
⑤ Select the number of displayed items.
- "Minimum" displays minimum number of items.
- "Intermediate" displays items that include related the minum items.
- "Overall" displays all items.
⑥ Show or hide "Description of item" part.
※ To know the relation between item and output, see the template.
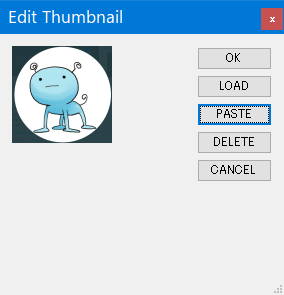
Edit Thumbnail Dialog
Loading or Pasting bitmap causes creating 100 pixel x 100 pixel bitmap for thumbnail. The width and height ration is preserved.
Edit Item Dialog
Edit State Dialog
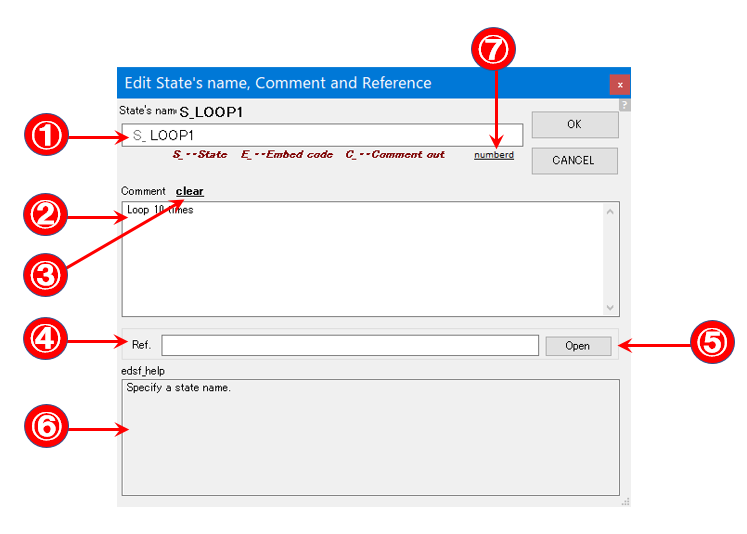
① Input State name.
See the reference.
② Inpunt Comment.
③ Clear comment.
④ Input reference link.
It is used for State Menu "Jump to link".
Input case #1) Specify StateGo File.
Selecting "Jump to link" on State Menu causes opening the StateGo file. If the file cannot be found on the current folder, this tool will traverse near folders to find it.
Input case #2) Specify URL.
Selecting "Jump to link" on State Menu causes opening opening brwoser with the url.
⑤ Open the reference link for test.
⑥ Discription of this dialog.
⑦ Clicking this text causes creating numberd node name. ex) S_0123
Edit Branch Dialog

① Input condition that is followed the programming language syntax.
② Input comment. The comment is displayed on state node.
The condition is displayed if comment is nothing.
③ Revert to the data before change
④ Checking causes selecting mode automatically when new condition is added.
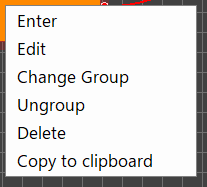
State Menu
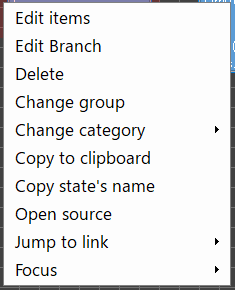
Edit items
Open Edit Item Dialog.Edit branch
Open Edit Branch Dialog.Delete
Delete this state.Change Group
Change the group that belongs the state.Copy to clipboard
Copy this state to clipboard.Jump to link
If the state has link data, jump to it.Focus
Move the focus to a state on the sub menu list.Specify State Dialog

① Specify State Name.
② Double clicking row causes to input the state name to ①'s text box.
※ Clicking "Path", "Stata" or "Comment" on the header causes sorting.
③ Filtter
Edit Item Text Dialog
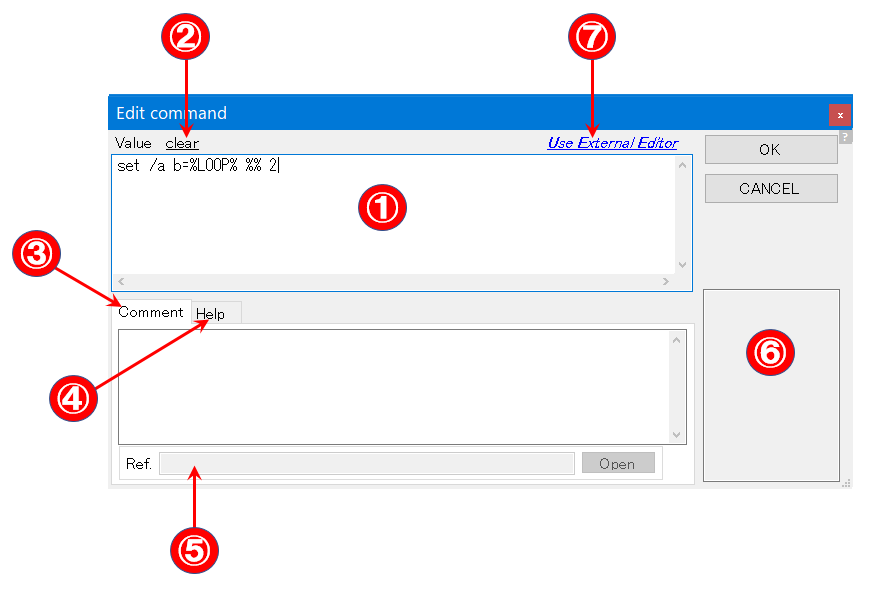
① Input data or program code here.
② Clicking causes deleting text on ①'s text box.
③ Input Comment.
④ Help message.
⑤ You may input reference link.
⑥ Input Specification.
※ In a case that the input specification is defined, the dialog will be displayed like below.
Blank Menu
Leave
Leave this group. Go to the upper group.New state
Create a new state.Paste
Paste nodes from clipboard.Paste without outflow
Paste nodes without outflow from clipboard.History
Move back or forward user manipulation.Focus
Move focus back or forward user manipulation.
Head
Move focus to a leading state.
Move focus back or forward user manipulation.
Head
Move focus to a leading state.Group Menu
Enter
Enter this group.Edit
Open Group Edit Dialog.Change group
Open Change Group Dialog.Ungroup
Make ungrouping this group.Delete
Delete this group.Copy to clipboard
Copy this group data to clipboard.Mutil-select-menu
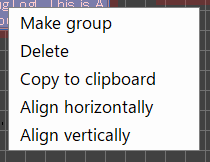
Make group
Open Edit Group Dialog to make a group.Delete
Delete these selected nodes.Copy to clipboard
Copy these slected nodes data to clipboard.Align holisontally
Aling holizontally selected states.Align vertically
Align vertically selected states.Configuration Dialog
Edit Item List Dialog
Insert/Remove/Up/Down
Clicking Index column on the target item causes to show sub-menu then select.Edit
Clicking Item name or Explanation, Method colums on the target item causes to show sub-menu then select.About Method
1st line : method (select,regex,regex_by_line)From 2nd line : parameter for selected mthod.
ex) Input one of the three values.
*select
apple
banana
orange
ex) Checking if a value is numeric.
*regex
[0-9]+
ex) Checking if a value is numeric for all lines.
*regex_by_line
[0-9]+
Find Dialog
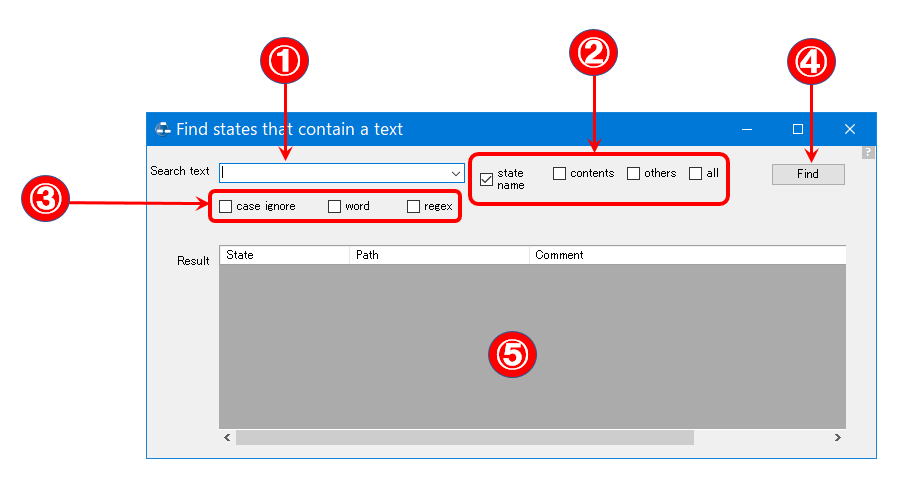
① Input text.
② Set range of search.
③ Set type of search.
④ Find Button
⑤ Output will be displayed.
Set Source Editor Dialog
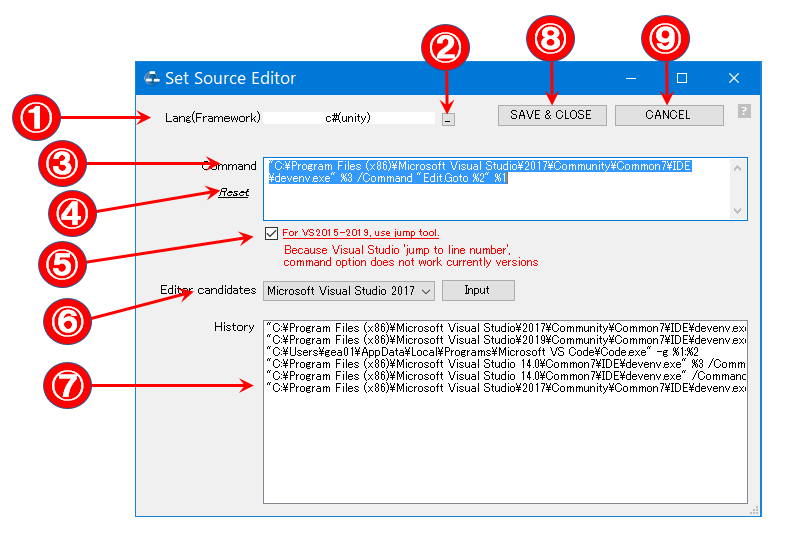
① Display using program language and framework.
② A button for changing using program language and framework.
③ Set command for editor.
There are two specail words for command.
%1 -- Used as file path.
%2 -- Used as line number.
%3 -- Used as solution file path.
④ Reset the command.
⑤ Set use or not use Visual Studio Jump Tool.
⑥ Input command by selecting tool.
⑦ Command history.
Set User Custom Button Dialog

① Set the button's name.
② Set the command.
③ If checked, the command will be executed right after the converting.
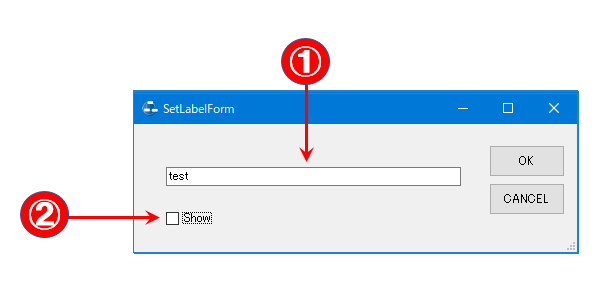
Set Label Dialog
Create Clone Dialog
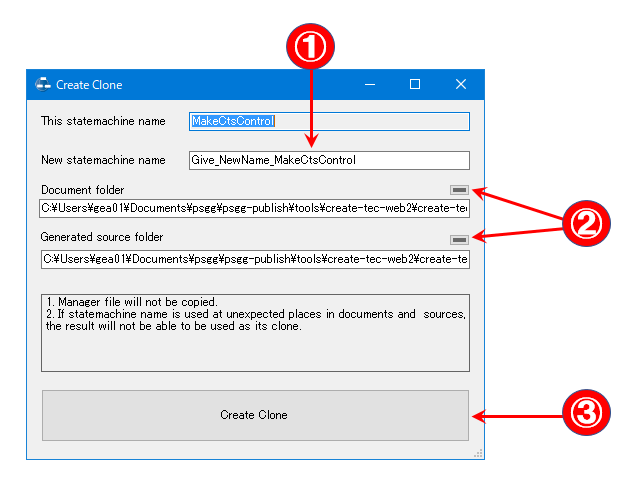
① Set the new state mchine name.
② If clicked, Directory Dialog will be opened.
③ Create a clone.
Search StateGo Dialog
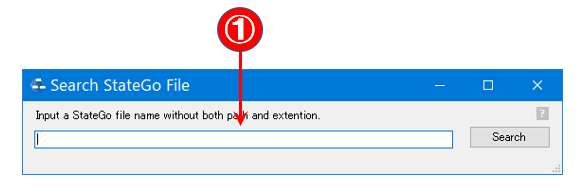
① Set the state machine name.
Search the state machine near the current document folder.
Group Dialog
